Guides & How-tos 7 min read
How to Build an AI Image Editor With Open Models (2026 Guide)
A practical guide to image-text-to-image editing: choose an open editing model, run it with diffusers, fit it on your GPUs and measure edit quality.
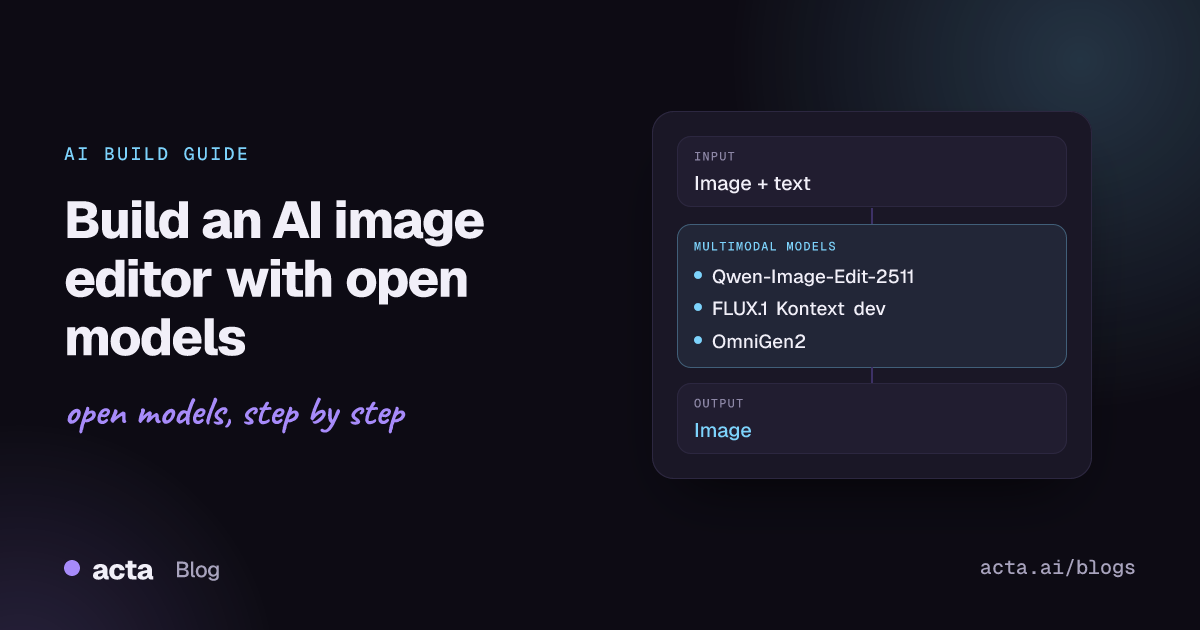
Quick answer: Image-text-to-image models take an input image plus a text instruction and return an edited or newly generated image, for example "make it winter" or "replace the background with a studio wall". The shortest path to an AI image editor is an open editing model such as Qwen-Image-Edit or FLUX.1 Kontext, run with the Hugging Face diffusers library on a GPU and wrapped in a Gradio or FastAPI app.
Text-to-image models start from noise. Image editors start from a picture the user already cares about, which makes the job harder: the model has to change exactly what was asked and keep everything else, including faces, product details and text, consistent.
Open models have become good enough at this for real products. This guide covers how they work, which ones to pick, working diffusers code, deployment, evaluation and the problems that show up once real users start uploading images.
What is image-text-to-image?
The Hugging Face task definition in the huggingface.js tasks package describes image-text-to-image models as models that take an image and a text prompt and generate a new image. It lists instruction-based editing, style transfer, image variations, reference-guided generation, and inpainting or outpainting as the main use cases.
Most current editing models are diffusion transformers (DiTs) with an extra conditioning path:
- Text understanding: a text encoder, often a full vision-language model, reads the instruction and sometimes the input image as well.
- Image conditioning: the input image is encoded by a VAE into latents and fed to the transformer as context tokens next to the noisy latents being generated.
- Denoising: the transformer iteratively removes noise for a set number of steps, guided by the instruction and the reference image, and the VAE decodes the result.
This "in-context" design is described in the FLUX.1 Kontext paper and the Qwen-Image technical report. Classic approaches such as diffusers image-to-image (noising a picture and regenerating it) still work for loose style changes, but instruction-tuned editors are far better at precise, local edits.
What can you build with it?
- Product photo editing: change backgrounds, lighting or colourways for e-commerce listings without a reshoot.
- Marketing creative variants: produce seasonal or regional versions of one approved image.
- Text-in-image edits: fix or translate text on signs, posters and packaging mock-ups.
- Photo retouching tools: remove objects, restore old photos or adjust expressions with plain-language commands.
- Multi-image composition: combine a person, a product and a scene from separate references into one shot.
- Design and game asset pipelines: restyle concept art or generate consistent character variations.
Which models should you use?
- Qwen-Image-Edit-2511 (Qwen/Qwen-Image-Edit-2511): the current Qwen editing model, strong at text rendering and multi-image editing, with some popular community LoRAs built in. Apache 2.0. Runs with the diffusers
QwenImageEditPlusPipeline. - FLUX.1 Kontext dev (black-forest-labs/FLUX.1-Kontext-dev): in-context editing with good character and style consistency across repeated edits. FLUX.1-dev Non-Commercial License, so commercial use needs a separate licence.
- FLUX.2 dev (black-forest-labs/FLUX.2-dev): the newer Black Forest Labs model used as the reference example on the Hugging Face task page. Check its model card licence before shipping.
- Step1X-Edit v1.2 (stepfun-ai/Step1X-Edit-v1p2): a reasoning-oriented editor from StepFun. Apache 2.0. Needs a diffusers fork branch for now, and large GPUs.
- OmniGen2 (OmniGen2/OmniGen2): a unified generation and editing model that handles in-context composition from several reference images. Apache 2.0 code; about 17 GB of VRAM natively, less with CPU offload.
Compare editors on GEdit-Bench, a benchmark of real-world editing instructions, and try them side by side in demo Spaces such as the OmniGen2 Space before committing.
How do you build it, step by step?
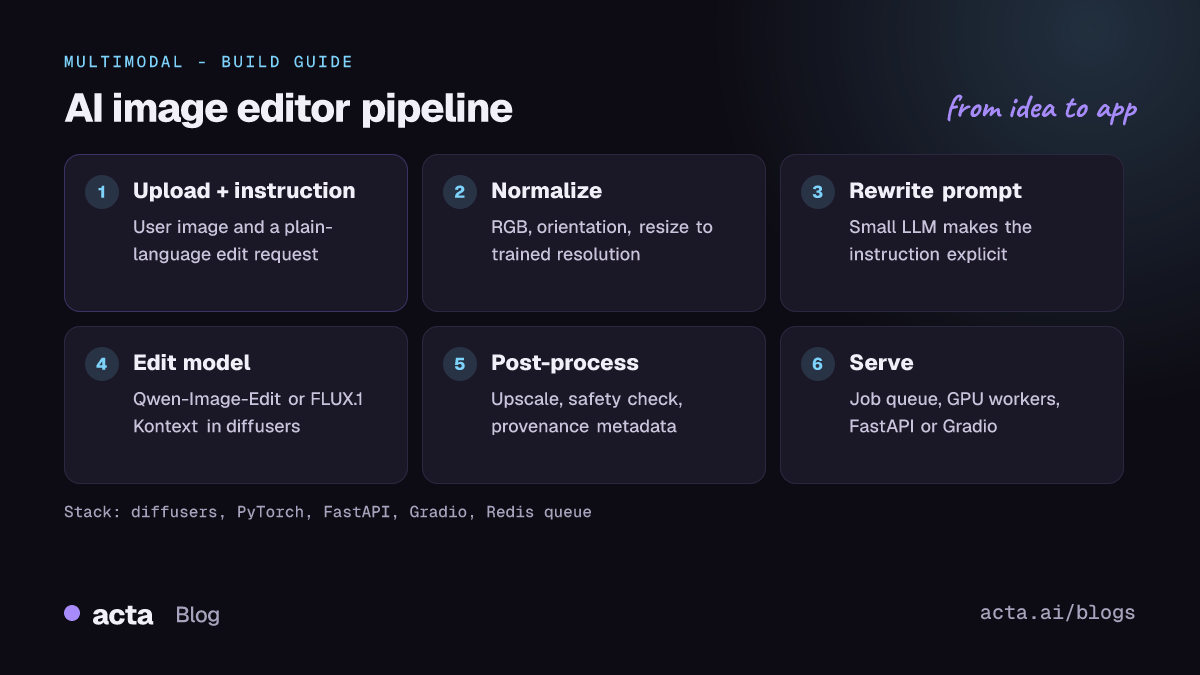
- Define edit types. List the edits your users need (background swap, object removal, text change, style) and collect 30 to 100 test images with instructions.
- Normalize inputs. Convert to RGB, fix orientation and resize to the resolution the model was trained on; keep the original for final compositing.
- Run the editing pipeline. Load the model in diffusers in bfloat16, fix seeds while testing and tune steps and guidance on your test set.
- Improve prompts. Rewrite short user requests into explicit instructions ("keep the person's face and pose unchanged") with a small text LLM.
- Post-process and check. Upscale if needed, add provenance metadata, and run a safety classifier on outputs.
- Serve with a queue. Edits take seconds to minutes, so put a job queue between your API and the GPU workers.
This example follows the QwenImageEditPlusPipeline usage in the Qwen-Image README (which asks for transformers 4.51.3 or newer and diffusers installed from GitHub source), using the 2511 checkpoint that the README recommends:
import torch
from PIL import Image
from diffusers import QwenImageEditPlusPipeline

pipeline = QwenImageEditPlusPipeline.from_pretrained(
    "Qwen/Qwen-Image-Edit-2511", torch_dtype=torch.bfloat16)
pipeline.to("cuda")

image = Image.open("product.png").convert("RGB")
inputs = {
    "image": [image],
    "prompt": "Replace the background with a plain light grey studio wall. Keep the product unchanged.",
    "generator": torch.manual_seed(0),
    "true_cfg_scale": 4.0,
    "negative_prompt": " ",
    "num_inference_steps": 40,
    "guidance_scale": 1.0,
    "num_images_per_prompt": 1,
}

with torch.inference_mode():
    output = pipeline(**inputs)
    output.images[0].save("edited.png")
The FLUX.1 Kontext version follows the diffusers Flux pipeline docs:
import torch
from diffusers import FluxKontextPipeline
from diffusers.utils import load_image

pipe = FluxKontextPipeline.from_pretrained(
    "black-forest-labs/FLUX.1-Kontext-dev", torch_dtype=torch.bfloat16)
pipe.to("cuda")

image = load_image("poster.png").convert("RGB")
prompt = "Change the headline text to 'Summer Sale', keep the layout and colors"
image = pipe(
    image=image,
    prompt=prompt,
    guidance_scale=2.5,
    generator=torch.Generator().manual_seed(42),
).images[0]
image.save("flux-kontext.png")
How do you serve and deploy it?
- GPU sizing: the diffusers docs note that loading all FLUX components takes roughly 50 GB of memory, and Step1X-Edit reports around 42 to 50 GB peak in bf16 on an H800. Plan for 48 to 80 GB cards, or use the memory tricks below.
- Memory reduction: diffusers supports model CPU offload, group offloading, VAE tiling, and 8-bit or FP8 quantization of the transformer and text encoder. Step1X-Edit reports peak memory dropping to 18 GB with FP8 plus offload. Expect slower generation and check quality after each change.
- Step distillation: distilled "Lightning" variants from the LightX2V project cut the number of denoising steps for Qwen-Image models, which reduces latency sharply.
- Multi-GPU serving: the Qwen-Image repo ships a multi-GPU Gradio API server with queue management, configured by environment variables.
- Hosting: Hugging Face Spaces (including ZeroGPU) suit demos; for production use dedicated Inference Endpoints or your own GPU workers behind FastAPI and a job queue such as Redis or Celery.
- Node-based tools: Qwen-Image is supported natively in ComfyUI, useful if your designers prefer a visual workflow.
How do you evaluate it?
- Instruction following: did the edit happen? Usually scored by a VLM judge or human raters, as in GEdit-Bench.
- Preservation: are unedited regions unchanged? Measure with LPIPS, SSIM or PSNR on masked regions, or DINO/CLIP image similarity.
- Text-image alignment: CLIP score between the instruction and the output, which the Hugging Face task page lists alongside FID.
- Image quality: FID on a sample set, plus human preference tests for your domain.
Public benchmarks include GEdit-Bench (evaluation instructions are in the Step1X-Edit repository) and OmniContext for multi-reference generation, released with OmniGen2. The OmniGen2 team also released EditScore, a reward model for judging edits automatically. Use benchmarks to shortlist, then run a blind A/B test on your own images.
Pitfalls and tips
- Licences: FLUX.1 dev-family weights are non-commercial; Qwen-Image-Edit, Step1X-Edit and OmniGen2 are Apache 2.0. Decide before you build your product around one model.
- Identity drift: faces and logos can change subtly after several edits. Re-anchor each edit on the original image rather than chaining outputs, and say explicitly what must stay unchanged.
- Resolution and aspect ratio: very large or unusual sizes degrade results. Edit at the trained resolution and composite back.
- Library versions: new pipelines often land in diffusers main first. Pin a commit and test upgrades.
- Abuse and consent: editing photos of real people needs clear policies, consent checks and output filtering. Watermark or label AI-edited images where required.
- Latency: 40 to 50 steps at 1024 pixels takes noticeable time. Show progress, offer a fast preview mode with fewer steps, and cache repeated requests.
Where can you get help?
- The diffusers GitHub Discussions (Q&A and Show and tell) for pipeline, memory and quantization questions.
- Model repos: Qwen-Image, Black Forest Labs flux and OmniGen2 issues for model-specific bugs.
- Demo Spaces and model community tabs on the Hub, where users share prompts and LoRAs.
Frequently asked questions
What is the difference between image-to-image and image-text-to-image?
Image-to-image covers any image transformation, including super-resolution and style transfer without text. Image-text-to-image adds a text instruction that says what to change, which is what makes conversational image editors possible.
Which open model should I start with?
Qwen-Image-Edit-2511 if you need a permissive licence and strong text editing. FLUX.1 Kontext dev if you are prototyping or have a commercial licence from Black Forest Labs.
Can I run an image editor on a consumer GPU?
Yes, with trade-offs. CPU offload and FP8 quantization bring several of these models into 16 to 24 GB, at the cost of speed. OmniGen2 reports about 17 GB natively.
How do I keep edits consistent across a series?
Fix the seed, reuse the same instruction template, edit from the original each time, and consider a LoRA trained on your brand or character.
Next steps in this series: turn edited stills into motion with our image-to-video guide, or describe and check images with a vision-language model.